How to create Update Service packages
The LS Retail Update Service is a solution to simplify the process of installing LS Retail’s products in stores and restaurants and keeping them up-to-date. A deployment manager can define one or more setups with different software components required for installation. The setup is then easily accessible through an installation tool that will install all the components selected for the setup including an update service that checks on a regular interval if a new version is available and updates the software. New versions of the components are then easily deployable from a central location.
This documentation will take you through how to set up the LS Retail Update Service server on your computer and how to create Update Service packages using the scripts we provide with the LS One development pack.
The LS Retail Update Service has its own online documentation that we recommend going through for more in depth information and tutorials on the Update Service.
Install the Update Service server.

This section is based on the Update Service Server Install section of the online help for the LS Retail Update Service but might be slightly modified to fit this specific scenario.
-
Download the latest Update Service server.
-
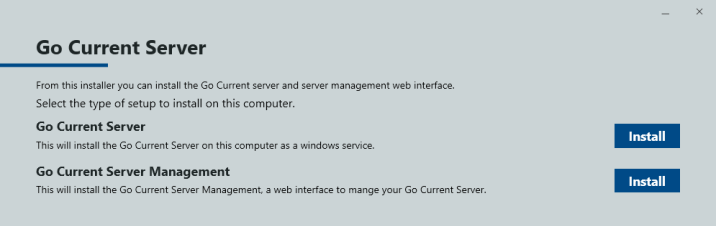
Run Go Current Server.exe
-
Select and install Go Current Server
-
You can optionally install SQL Server Express, by checking the box in Select Optional Components page:

-
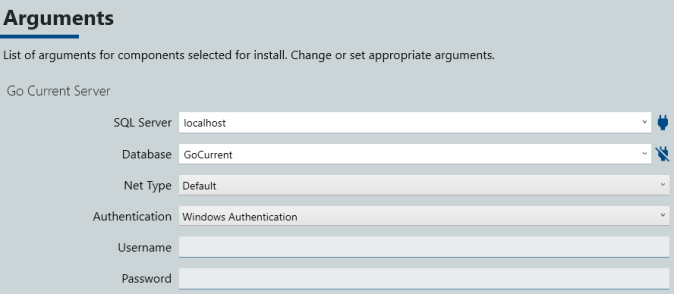
Select a SQL instance and a non-existing database to be created:
-
Other arguments can be left with default values.
-
On the Ready to Install page, click Install.
-
-
Run the Go Current Server.exe again and select and install Go Current Server Management.
-
Now, from the Windows Start Menu, select Go Current Management or go to http://localhost:8030/.

If a Update Service database cannot be created during the installation, it will continue successfully and not give any warning or errors.
You can create a new database with the New-GocsDatabase cmdlet. Specify a connection string where you want the database to be created in an existing SQL instance:
PS C:\> New-GocsDatabase -RunAsCurrentUser -ConnectionString 'Data Source=localhost;Initial Catalog=GoCurrent;Integrated Security=True;'
You should at this point have the Update Service up and running and ready to create packages.
At this stage we recommend you get familiar with the Update Service server.
Create package
Before creating packages you will have to have already created installers for the application you want to create a package for.
To learn how to create installers go to the How to create the installs section of the development help.
In the development pack, navigate to DevPack\Source\Update Service Scripts in the File Explorer. There you see three batch files called CreateSM Package, Create POS Package & Create SS Package.

These scripts all run the CreatePackage.ps1 script with different parameters depending on if you want to create a package for the Site Manager (SM), POS or the Site Service (SS).
Execute any of these scripts by double clicking them will create a package for that application in a new folder called Output and push the package to the Update Service server.
If you are running the Update Service server on a different machine you will have to edit the CreatePackage.ps1 script.
In the last line of the script you can see where we call the Import-GocsPackage Cmdlet. This Cmdlet accepts parameters -Server and -Port and can be called like this:
Import-GocsPackage -Server myserver -Port serverport -Force
Create installer for the packages
In your server management interface (http://localhost:8030/):
-
If the left menu is not visible, then click the hamburger symbol and the menu will appear (only necessary on small screens/windows).
-
In the left menu click Installers.
-
Click the + symbol (hovered: New Installer) on the top right.
-
A dialog will appear to create a new installer.
-
-
Now lets say you want to create an installer for the Site manager package.
-
Type in a name and description for the installer (Site manager for example) and then click Submit to create a new installer.
-
Now you have created an installer, but it does not include any packages to install.
-
-
In the installer view, click the + symbol (hover: Add package to installer) on the top right.
-
In the package field, select the appropriate package (Site Manager) and then click Submit.
-
Now you've added the package to the installer.
-
-
Click the download symbol (hovered: Download installer) to the top right.
-
Run the downloaded installer executable and try to install the package.
-
Now if you navigate to C:\Program Files\LS Retail\Site Manager package install in the file explorer you see that the Site Manager is installed on your computer.
-
-
You can repeat for the other two packages
Now this package is installed on your computer and every time you update the package you can open the Update Service client and update the packages.
Moving forward with the LS Retail Update Service
This is only an example of what can be done with the LS Retail Update Service. We highly recommend you to look at the online documentation for the LS Retail Update Service and think about how it could simplify the process of installing and updating LS One for your clients.

