How to implement a service project
All of the services have some code in them. Some of them only have a constructor but others have a lot of code.
To implement a customization the partner needs to add the existing service project and then change the default implementation.
- Open the Visual Studio solution provided in the development pack.
- Source > Solution.sln
- Configure the solution for the current machine
- Right-click on the POSStartProject project and select Properties.
- Click on the Debug tab.
- Check the Start external program option. Click on the … button.
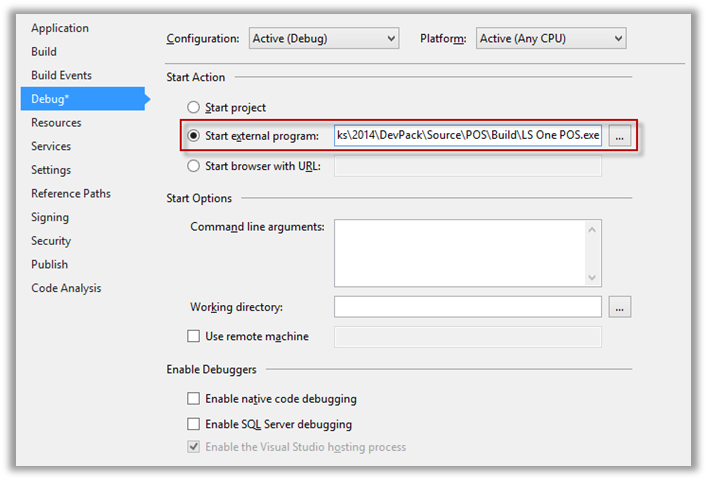
- Navigate to the location where you put the development pack. In the development pack navigate to the POS Build path and select LS One POS.exe.
Source > POS > Build > LS One > POS.exe - Right-click on the POSStartProject and click Set as StartUp Project.
- Navigate to the CurrencyService project within the Solution Explorer.
- POS > Services > CurrencyService
- Customize the LSOne.Services.Currency.dll
- Right-click on the CurrencyService project and select Properties.
- The Application tab has system information about the dll that will be built using this project. The Assembly name is the name of the dll output and the Assembly information button allows you to change information that will be visible when right-clicking the actual dll.
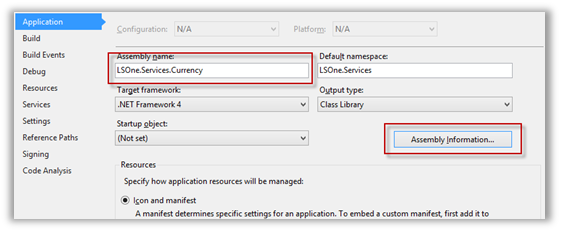
- Click on the Assembly Information button and add to the Title information any text you want.
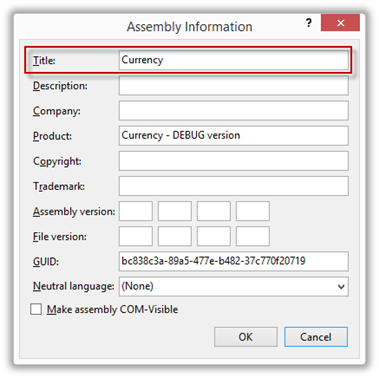
- Click on OK.
- Save the solution.
- Right-click on the Currency project and select Build.
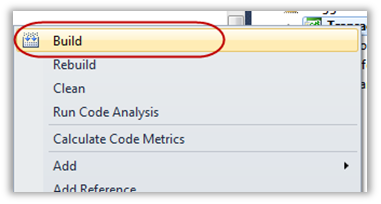
- The project should build successfully.
- Go to the build output folder for the solution and find the Services folder. DevPack > Source > POS > Build > Services
Find the LSOne.Services.Currency.dll, right-click on it, select Properties, select tab Details. In File description you should see the text you added to the Assembly information previously.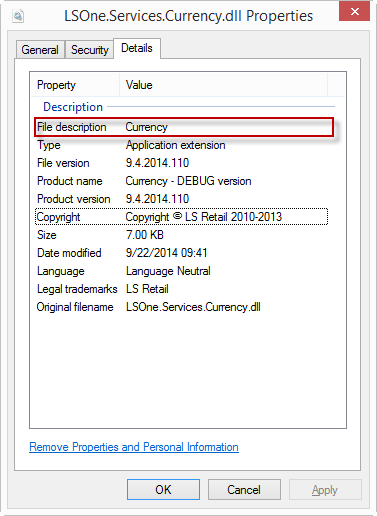

If at this point you get build errors saying Unable to copy file and Access to path then you need to run the Visual Studio as an administrator or make sure that you have write access to the folder where the LS One POS is installed.
- Running a Customized dll using the LS One POS.
- Find function ExchangeRate in CurrencyService.cs and set a breakpoint on the first line in the function. Breakpoints can be added by either setting the cursor on the line and pressing F9 or clicking with the mouse where the red circle is in the picture below.

- To run the project you can either use the Play button or press F5.
- The LS One POS will start.
- Log on to the LS One POS.
- Sell an item and pay for it using the operation PayCurrency.
- Because a breakpoint was set in ExchangeRate, once the LS One POS starts calculating any exchange rates, the control will be given over to the customization solution.

- To let the LS One POS continue, hit either F5 or the Play button again.
- To stop the running of the LS One POS program through the development environment, either exit the LS One POS as usual or you can set the focus on the Visual Studio and press Shift + F5.

- Find function ExchangeRate in CurrencyService.cs and set a breakpoint on the first line in the function. Breakpoints can be added by either setting the cursor on the line and pressing F9 or clicking with the mouse where the red circle is in the picture below.
- Customize an existing code
- Any function and code can be changed in the open source modules as long as the interface remains as it was. Anything that can be done in code can be done in these services, for instance, instead of getting the exchange rates from a table, contact a web service and receive them from there.
- Exception handling and logging
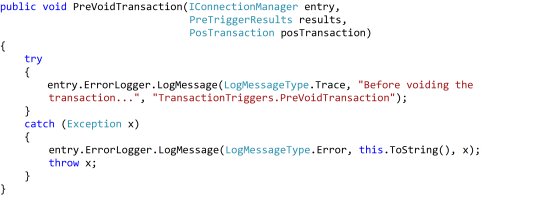
- The LS One POS framework provides support for trace and error logging.
- The ErrorLogger in the database entry provides functionality for logging trace and error messages. The type of logging is controlled by a type enum showed in the code example below.